Spring 2006:
A Theremin!
Ok, this is seriously out of the way of bagpipe making, but what are you gonna do? I've had the jones for a theremin since i knew there were theremins, and i've recently been inspired to get more into experimental music, so here we are.
This particular theremin was built from a kit available from PAiA Electronics, who have been making music-related electronics kits for decades. It was absolutely the best way to go for an affordable, fully featured traditional two-antenna theremin. The kit arrived as an empty circuit board and an alarmingly full bag of components. In-progress photos of electronic assembly would be kind of boring, so i don't have any. The assembly went pretty smoothly, thanks largely to the excellent instruction manual with the kit, and my own double- and triple-checking everything along the way. When i finally powered it up for the "smoke test," it all worked the first time, exactly according to the manual, which caused me to make a few happy sounds of my own. I did have to do a little minor tweaking once i put it all into the box, but overall it was a pretty straightforward build. I'm certainly no electronics genius, and this kit was easily the most complex electronics project i've undertaken, so i'm pretty chuffed that it came out so well.
But BOY HOWDY is it hard to play anything like music on it! Mind you, i've only had it together for a couple of days, so there's lots of time yet. There's also a lot of room for individual musical goals with it, from movie sound-effects to classical violin/cello repertoire. Myself, i'm right now aiming for a "musical saw" level of musicality.
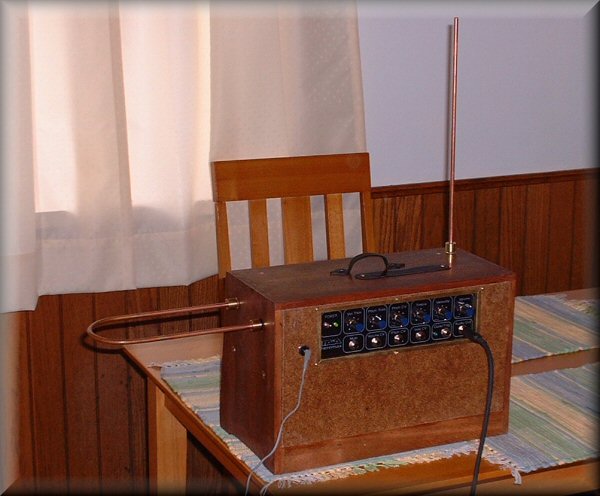 |
Here is the player's side of the instrument. The control panel is an optional extra for the PAiA kit, but one which i felt was worth the extra cost. It would have been a drag to drill all the holes for the knobs and jacks, and label everything, without having it look really hokey. The PAiA control panel is really nicely made and printed.
My antennae are made from 1/4" solid copper rod, turned down at the ends to plug into 1/4" phone jacks, so they're removable for storage. |
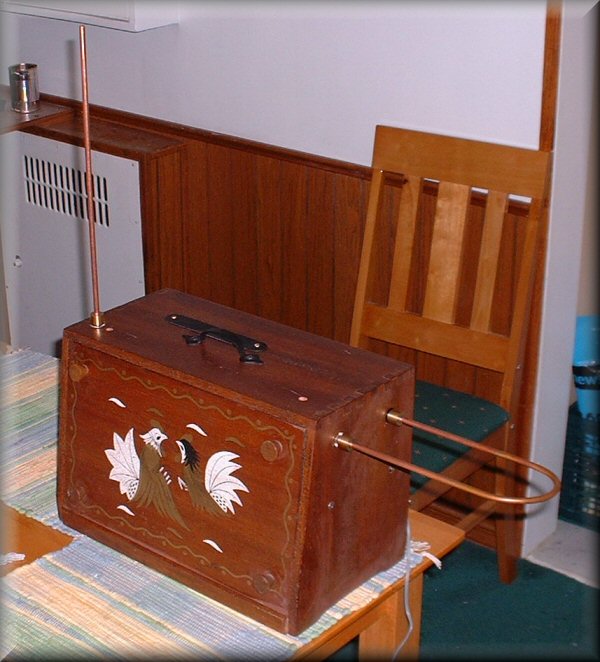 |
This is the back (or "audience") side. The box is an old wooden breadbox i picked up (of course) on eBay. I searched for a week or two before finding a box that would be the right size, and this one is perfect. The roosters on the door give it a bit of old-school charm, as does the iron handle, which i added. The narrow black panel on the top gives access to the oscillators inside, for coarse calibration of the pitch and volume circuitry.
|
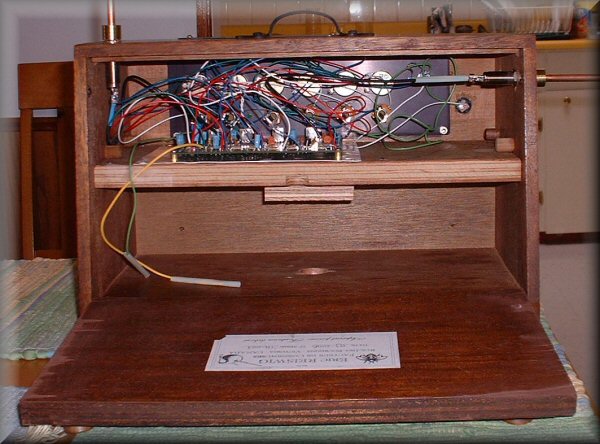 |
Here is the view with the door open so you can see the guts of the thing. The circuit board is attached to the shelf halfway up. You can also see the antenna jacks and the back of the control panel. The lower half of the box provides handy storage for the antennae, the power adapter, amp cable, and whatever else the Thereminist-on-the-go might need. There's also a hole in the bottom so the box can sit on a mic stand if a table isn't available or suitable. |
|
Ok, the real point of this page is to show what it sounds like as well, so here we go. The theremin has a long history of sound effects as well as real music, so i don't have to pretend that this is music. Here's a short sample climbing up and down the wide pitch range, followed by some attempts at more controlled notes. Enjoy! |
Last updated on 6 March 2006, by Penny.
Back to the index page